🛡️ Building a Dashboard for Group/Category Based Content Filtering for Pi-hole.
Internet Managment Solution for Pi-hole
🛡️ Building a Dashboard for Group/Category Based Content Filtering for Pi-hole.
Overview
In this guide, we walk through how we created a custom Pi-hole Dashboard using Flask with features like query logs, regex blacklisting, real-time alerts, and group toggles. We also detail how we deployed the app securely using ModSecurity + OWASP CRS behind an Nginx reverse proxy in Docker.
🔧 Key Features of the IMS Dashboard (Internet Managment Solution)
✅ 1. User Authentication
- Login system using Flask sessions.
- Basic credentials (
admin/whoamiby default — replace in production).
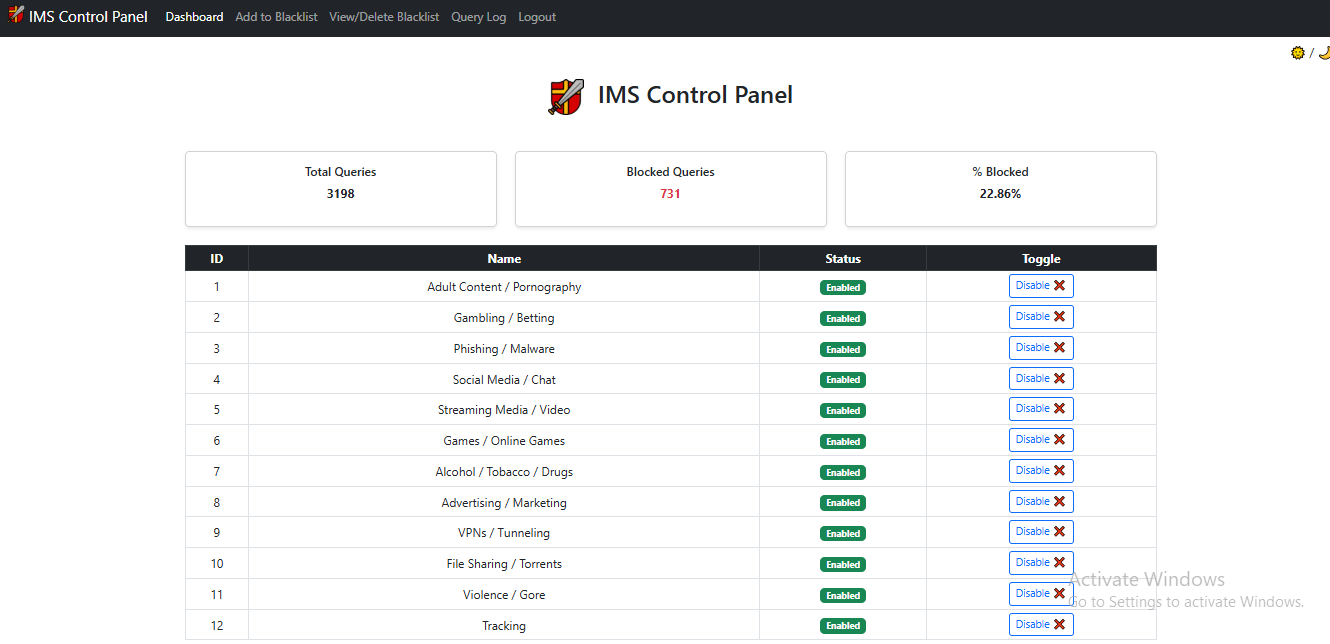
📊 2. Live DNS Statistics
- Total Queries
- Blocked Queries
- Block Percentage
- Auto-refreshed every 5 seconds via AJAX.
🧾 3. Query Log Viewer
- Real-time display of the latest 100 queries from Pi-hole.
- Blocked domains highlighted using Bootstrap’s red table rows.
- Auto-updates every 5 seconds.
- Alerts shown if newly blocked domains are detected.
🧰 4. Pi-hole Group Management
- Dashboard homepage shows all non-default Pi-hole groups.
- Displays:
- Group ID
- Name
- Current Status (Enabled / Disabled)
- Enable/Disable toggle buttons for each group.
- Calls
/toggle_group/<group_id>which updates Pi-hole’sgravity.dband reloads DNS.
🚫 5. Blacklist Regex Management
- Add domains or full URLs to the Pi-hole regex blacklist.
- Prevents duplicates.
- Avoids blacklisting domains already whitelisted via
whitelists.yml. - Assign domains to selected group (one group per domain enforced).
🧹 6. Blacklist Viewer & Domain Removal
- View blacklisted domains for each group.
- Delete specific regex entries safely (removes from both mapping table and domainlist if unused).
🚨 7. Real-Time Alerting
- Frontend polls
/recent-blocked-domainsevery 10 seconds. - New blocked domains trigger an on-screen alert.
- Alerts persist with cooldown using
localStorageto avoid spamming.
🧱 Tech Stack
- Backend: Flask
- Frontend: Bootstrap 5 + Vanilla JS
- Database: SQLite (
/etc/pihole/gravity.db) - Security: ModSecurity + OWASP CRS
- Reverse Proxy: Nginx (Docker)
- System: Alpine Linux in Proxmox LXC
📦 Requirements
requirements.txt:
Flask==2.3.3
requests==2.31.0
PyYAML==6.0.1
Install with:
1
pip install -r requirements.txt
🚀 Deployment Guide
1. Start Flask on Host (Port 5000)
Optional OpenRC service file (for Alpine Linux):
1
2
3
4
5
6
7
#!/sbin/openrc-run
command="/usr/bin/python3"
command_args="/root/pihole-dash/app.py"
pidfile="/run/pihole-dashboard.pid"
name="pihole-dashboard"
description="Pi-hole Flask Dashboard"
command_background=true
Start with:
1
2
rc-update add pihole-dashboard
rc-service pihole-dashboard start
2. Dockerized Nginx with ModSecurity
Dockerfile
1
2
3
4
5
6
7
8
9
10
11
12
13
14
FROM owasp/modsecurity-crs:4.15.0-nginx-alpine-202506050606

USER root

#COPY ./nginx.conf /etc/nginx/conf.d/default.conf

# Update apk repos and install certbot + nginx plugin + bash (optional)
RUN apk update && apk add --no-cache \
    certbot \
    certbot-nginx \
    bash

CMD ["nginx", "-g", "daemon off;"]
nginx.conf (Localhost, No HTTPS)
1
2
3
4
5
6
7
8
9
10
11
12
13
14
15
16
17
18
19
20
21
22
23
24
25
26
27
28
29
30
31
32
33
34
35
36
37

server {
    listen 80;
    server_name localhost;

    # Reverse proxy to Flask app running on host system
    location / {
        proxy_pass http://192.168.1.15:5000;  # or http://<host-ip>:5000 if not on Docker Desktop
        proxy_http_version 1.1;
        proxy_set_header Host              $host;
        proxy_set_header X-Real-IP         $remote_addr;
        proxy_set_header X-Forwarded-For   $proxy_add_x_forwarded_for;
        proxy_set_header X-Forwarded-Proto $scheme;
    }

    # Security headers (optional for local testing)
    add_header X-Frame-Options "DENY" always;
    add_header X-Content-Type-Options "nosniff" always;
    add_header X-XSS-Protection "1; mode=block" always;
    add_header Content-Security-Policy "default-src 'self';
        style-src 'self' 'unsafe-inline' https://fonts.googleapis.com https://cdn.jsdelivr.net;
        script-src 'self' 'unsafe-inline' https://cdn.jsdelivr.net;
        font-src 'self' https://fonts.gstatic.com https://cdn.jsdelivr.net;
        connect-src 'self';
        img-src 'self';" always;
    add_header Referrer-Policy "strict-origin-when-cross-origin" always;
    add_header Permissions-Policy "geolocation=(), microphone=(), camera=()" always;
    add_header Cache-Control "no-store, no-cache, must-revalidate, proxy-revalidate" always;
    add_header Expect-CT "max-age=86400, enforce" always;

    # Hide nginx version
    server_tokens off;

    # Custom error page (optional)
    error_page 404 /404.html;
}
4. Run Nginx Docker Container
1
2
docker build -t ims-dashboard-nginx .
docker run -d --name ims-dashboard-nginx  -p 80:80 -p 443:443 --add-host=host.docker.internal:host-gateway ims-dashboard-nginx
🔒 Security Tips
- Replace default credentials
- Use HTTPS (Certbot) if exposing externally
- Use
ufwor iptables to restrict access - Consider adding fail2ban to protect login endpoint
- Don’t disable ModSecurity rules globally — use targeted overrides
✅ Final Thoughts
This project brings together a clean UI for Pi-hole admins, with real-time data and security-focused deployment practices. It’s ideal for home networks or small environments where simplicity and visibility are key.
Happy Pi-holing! 🧠🔒
This post is licensed under
CC BY 4.0
by the author.